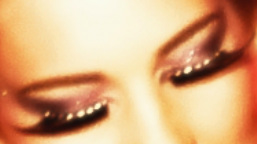
False lashes are practically a necessity for stage performers! They add drama, make the performer's eyes look huge and help create a glamorous persona. Below are a few tips and ideas specifically about strip lashes (a pair of full lashes which are knotted onto a plastic band or strip):
- Here is a link to one of my favorite places to buy lashes online: www.madamemadeline.com. They have great prices and ship really fast!
Below are some of my recommendations:
Ardell Wild Lash "Crazy" - I like to use these as a base for doubling up with a blingy pair. The blue in them makes the whites of your eyes appear even whiter!
The Extreme Collection Extravagant - These are the top pair pictured above.
Elise Brand - Most of these are perfect for stage. There is something for everyone! - Apply your lashes first-thing, before any moisturizers or makeup. If they are applied to clean, bare skin, versus being applied on top of makeup, they will stick much longer.
- I like to use Shu Uemura's Eye Lash Adhesive which is formaldehyde-free and perfect for sensitive eyes and contact lens wearers.
- You have a few options for applying the glue to the lash strip. First, you can squeeze it directly onto the band. Be careful to not squeeze too much out, as you want a thin line of glue only on the plastic band. Or you can squeeze some out onto a clean surface, like a plastic or metal mixing palate, and then either drag the band through the glue or use a toothpick to "brush" it onto the band.
- Wait about 5-10 minutes for the lash glue to dry before applying them to your eyelids. The glue will be too wet if you don't wait long enough, causing them to slip around when being applied. I know the lashes are ready when the glue on the two outside edges of the band starts to look transparent.
- Before applying, I use my finger to wipe off any excess glue from the band, get the glue off my finger, and then apply them. Aiming for the intersection of where my real lashes grow out of my eye lid, I start pressing the strip in the middle of my upper lash line, then press towards the outside, and finally from the middle towards the inside.
- Make sure you don't get the lash band too close to the inside corner of your eye. It can scratch you and become uncomfortable! It's better to have the excess width of the band curving up and out on the outside edges of your eyes. This can create the appearance of larger eyes! Or you can use scissors to shorten the overall width of the strip band (NOT the actual length of the lash hairs - don't trim those).
- After the lashes are stuck in the correct position, using clean hands or a clean eye lash curler, gently press the false lashes into your real lashes. Make sure not to pull the false lashes off and make sure your fingers/lash curler are free of glue! Most eye lash curlers have a little "cage" that you have to insert your lashes into before pressing down to curl them. If you are wearing huge false lashes, your typical lash curler won't work! I use THIS lash curler by Japonesque which doesn't have the "cage."
- You can double up on strip lashes for maximum dramatic effect! Put a plain pair on the bottom and a sparkly, blinged-out pair on top (as pictured).
- After the glue has dried, you can continue to apply the rest of your makeup. The very last thing I do after all my makeup has been applied is put mascara on the underside of my lashes. This helps to blend my real lashes with the false lashes, and it creates a nice, lush, black color. This is important because the lashes probably got powder and other makeup products on them during makeup application.
- Another tip for camouflaging the false lashes is to use a black felt tip liquid liner pen like Stila's Stay All Day Waterproof Liquid Eye Liner to color over any areas on the false lashes that got powder or eye color on them. This will make the false lashes look shiny and black.

